
Deploying SAP with Azure Virtual Machines
Introduction
Azure Virtual Machines (VMs) are crucial components when it comes to successful deployment of SAP solutions on Azure. These virtualized computing instances act as digital counterparts to the physical servers, enabling businesses to seamlessly operate SAP applications within the cloud environment. With VM’s, companies gain access to dynamic resource allocation, scalable infrastructure, and optimal performance required for handling SAP workloads efficiently.
In this blog we will delve into the key intricacies of running SAP on Azure Virtual Machines (VMs), providing you with a comprehensive understanding of its advantages and considerations you need to keep in mind. Our goal is to inspire you to explore the immense potential of running SAP on Azure VMs and equip you with the knowledge necessary for a smooth and successful implementation.
Azure Virtual Machines (VMs)
Virtual machine (VM) are a fundamental infrastructure-as-a-service (IaaS) provided by Microsoft Azure, providing consumers with versatile compute and storage resources in the cloud.
Flexibility and Control
Azure VM’s are not only on-demand but also highly scalable compute resource, offering users the convenience of creating and deploying VM instances in the cloud. Much like physical servers, VMs gives you control over the operating system (OS), empowering you to run customized software and configure hosting settings to suit your needs.
One of the significant advantage of Azure VMs is that it offers the flexibility of virtualization without the need for purchasing and maintaining the physical hardware. Nevertheless, as an IaaS solution, it is still imperative to configure, update and maintain the software that runs on the VMs.
Seamless Integration
Azure Virtual Machines actively supports cross-premises connectivity, simplifying integration with on-premises domains, SAP system landscapes and private clouds. This connectivity fosters collaboration between your on-premises infrastructure and the cloud environment.
Rapid Provisioning and Versatile Options
With Azure Virtual Machines, organizations can provision VMs and allocate compute and storage resources in a matter of minutes, allowing for faster deployment and scalability. You can expedite the process by either creating new VMs or leveraging pre-configured VM images, which serves as a templates complete with the operating system and additional software such as web hosting environments or deployment tools.
Tailored Configuration
Azure Virtual Machines offers flexibility when it comes to choosing VM sizes and configurations that aligns with the specific needs of SAP applications. The platform present various deployment options, including virtual machine scale sets, availability zones, and availability sets. These options empower organizations to architect their systems for high availability and fault tolerance, ensuring seamless operations.
Diverse Application Support
Overall, Azure Virtual Machines offers a reliable and efficient platform for deploying various applications, including SAP NetWeaver-based, SAP HANA-based applications and classical applications. It enables organizations to leverage the advantages of cloud computing without the need for extensive on-premises infrastructure.
Azure Virtual Machines serve as the cornerstone of Microsoft Azure’s IaaS offerings, delivering unparalleled flexibility, control, and scalability. By seamlessly integrating with existing infrastructure, offering rapid provisioning, and accommodating diverse application needs, Azure VMs empower organizations to leverage the cloud to its fullest potential.
Whether you’re considering SAP deployments or other applications, Azure VMs offer a powerful and efficient solution that bridges the gap between on-premises and cloud environments, providing the agility needed to thrive in the digital age.
Types Of VM Workloads
In the world of cloud computing, various types of workloads find their place, each with unique characteristics and computational needs. These workloads include:
- Batch Workloads: These are tasks that are executed in large volumes at scheduled intervals, often seen in data processing and data analysis.
- Database Workloads: Workloads centered around managing and processing databases efficiently, crucial for businesses reliant on data-driven decision-making.
- Transactional Workloads: Often associated with e-commerce and financial systems, transactional workloads require rapid and reliable processing of numerous transactions.
- Analytical Workloads: These workloads are focused on deep data analysis, requiring substantial computing resources to uncover insights from vast datasets.
- High Performance Workloads: Workloads demanding exceptional processing power, memory, storage, and network bandwidth for tasks like scientific simulations and rendering.
Matching Resources to Workloads
The computing requirements can include factors such as processing power, memory, storage and network bandwidth. Each workload may necessitate different levels of these resources based on its specific characteristics, complexity and demands. By recognizing the diverse computing requirements of workloads, organizations can allocate the appropriate resources and infrastructure to ensure optimal performance and efficiency for each task or process.
When evaluating Azure VM workloads, its crucial to assess the suitability of different application types and workloads for running on Azure VMs. Here are key factors to consider:
Suitable Workloads for Azure VMs
- Periodic, unpredictable growth or spiking workloads.
- Highly available service workloads.
- Steady workloads
Unsuitable Workloads for Azure VMs
- Low volume or limited growth workloads (like legacy applications that require low latency).
- Regulated environment workloads
Understanding the nuances of various workload types and how they align with Azure VM capabilities is essential for making sound decisions in the cloud era. By matching the right resources to the right workloads, organizations can unlock the full potential of Azure VMs, achieving optimal performance, scalability, and cost-efficiency in their cloud-based operations.
Azure VM Deployment Options
When deploying virtual machines (VMs) on Azure, you have access to diverse range of deployment methods that cater to different preferences and automation requirements.
Below are the some of the widely used deployment methodologies:
- Azure Portal: Azure Portal offers a user-friendly, graphical interface for VM deployment, making it accessible to those who prefer a visual approach.
- Azure PowerShell: Azure PowerShell is a powerful command-line tool that allows for script-based VM deployments, enabling automation and fine-grained control.
- Azure CLI: Azure Command Line Interface (CLI) is another command-line option, known for its simplicity and cross-platform compatibility, making it a preferred choice for many.
- Azure SDK: The Azure Software Development Kit (SDK) provides developers with comprehensive libraries and tools for building and deploying VMs programmatically, ideal for custom solutions.
- Azure API: Azure’s robust Application Programming Interface (API) allows for deep integration and automation of VM deployment processes, offering flexibility and control.
- Terraform: Terraform is an Infrastructure as Code (IaC) tool that’s gaining popularity for its declarative approach to VM deployment, enabling consistent and scalable infrastructure.
- ARM Templates: Azure Resource Manager (ARM) templates offer a template-based approach to VM deployment, facilitating repeatable and version-controlled infrastructure provisioning.
For a more in-depth understanding of these deployment methodologies, please refer to our comprehensive blog titled SAP on Azure – a beginners guide to getting started. In this blog, you’ll find detailed insights into each of these options, helping you choose the best method that aligns with your specific needs and preferences.
In the world of Azure VM deployment, having a variety of methods at your disposal empowers you to choose the approach that best suits your requirements. Whether you prefer a graphical interface, command-line scripting, or Infrastructure as Code, Azure offers the tools and flexibility needed to efficiently deploy and manage your virtual machines.
Azure VM Deployment Checklist
Ensuring a successful migration of on-premises servers to Azure, demands thorough planning and meticulous execution. You have the flexibility to choose the migration approach that best suits your needs, whether it involves moving all servers at once, in small batches, or individually.
However, before creating any virtual machines, it is crucial to carefully assess your current infrastructure model and identify how it can be effectively mapped to the Azure cloud. This analysis will help you understand the dependencies and requirements of your applications and systems and make informed decisions for a seamless transition to Azure.
Each Azure VM is built from collection of components or objects such as operating system, networks, disk storage, NIC etc. Below are the checklist items:
- Network
- Resource Group
- Size of VM
- Location
- Storage Disks
- Operating System
Network
Begin your assessment by focusing on your on-premise servers. In Azure, virtual networks (VNet) enable private connectivity between Azure VMs and other Azure services. VMs and services within the same virtual network can communicate seamlessly. By default, services outside the virtual network cannot access services within it. However, you have the ability to configure the network to allow access to external services, including your on-premise servers.
Changing the network addresses and subnets after configuration is not an straightforward task. If you intend to connect your private company network to Azure services, its crucial to carefully plan the topology before deploying any virtual machines.
When setting up a virtual network, you actively specify the available address spaces, subnets, and security. If the VNet connects to other VNets, it becomes necessary to choose address ranges that do no overlap with each other.
Resource Group
In Azure, each VM is created within resource group. A resource group serves as a logical containers for effectively organizing and managing related Azure resources. These resources may include virtual machines (VMs), databases, storage accounts, databases and more, all of which are deployed and utilized within Azure.
Resource groups are basic building blocks of your cloud infrastructure. Think of them as buckets that contains all the components you want to manage together, from the moment of initiation, all the way to retirement. It is highly recommended to group resources based on their lifespan and entity responsible for managing them. Assigning meaningful names to resources simplifies resource location and enhances your understanding of their roles.
Size of VM
When it comes to deploying virtual machines (VMs) on Azure, making the right choices regarding VM size, location, storage, and the operating system is crucial for a successful migration.
Before you select a VM size, its essential to determine your specific VM requirements. A recommended approach is the build a server inventory of current environment. This environment should capture the essential details like CPU, memory, storage, and network bandwidth based on workload or application needs.
Azure VMs offer preconfigured VM sizes that determine the available memory, CPU cores, and other resources. These sizes are optimized for different workloads, with some tailored for memory-intensive tasks and others finely tuned for CPU-intensive workloads.
To choose the appropriate VM size, you should consider the type of workloads your machine needs to run. Then, choose from a wide range of Azure VM types, to match your specific needs.

When migrating an existing workload to Azure, start with a VM size that closely matches your on-premises servers. Measure your workload’s performance in terms of CPU, memory, and disk IOPS, and adjust the VM size as needed for optimal performance. You can choose from wide range of Azure VM deployment methodologies that suit your requirements.
Location
Azure has data centers across the globe with servers and storage disks. These data centers are organized into various geographical regions ensuring redundancy and availability.
With your preferred regions, you have the ability to allocate resources such as CPU, memory, and disks to each virtual machine. Placing your VMs in close proximity to your users, based on regional location, enhances performance. Additionally, the machine’s location guarantees compliance with legal, regulatory, and tax requirements.
When it comes to determining VM location, consider these two critical aspects:
- Resource Availability: The VM location can impose limitations on your available hardware options. Each region provides a diverse range of hardware configurations, and not all regions support every configuration.
- Cost Considerations: There are price differences exist between the locations. To identify the most cost-effective option, compare the required configuration in different regions.
Storage
All Azure VM’s come with a minimum of two virtual hard disks (VHDs). The first disk holds the operating system, while the second disk serves as a temporary storage, resetting with each machine restart. For storing application data, it is advisable to add additional data disks.
By segregating data onto different disks, you gain the privilege to manage the disks independently. The size of VM determines the maximum number of data disks you can attach to your VM. Typically, its data disks per vCPU.
To help you make a decision, the following table compares the five disk types
| Standard HDD | Standard SSD | Premium SSD | Premium SSD v2 | Ultra Disk | |
| Disk type | HDD | SSD | SSD | SSD | SSD |
| Scenario | Backup, noncritical, infrequent access | Web servers, lightly used enterprise applications and dev/test | Production and performance sensitive workloads | Production and performance-sensitive workloads that consistently require low latency and high IOPS and throughput | IO-intensive workloads such as SAP HANA, top tier databases (for example, SQL, Oracle), and other transaction-heavy workloads. |
| Max Disk Size | 32,767 GB | 32,767 GB | 32,767 GB | 65,536 GB | 65,536 GB |
| Max Throughput | 500 Mbps | 750 Mbps | 900 Mbps | 1,200 Mbps | 4,000 Mbps |
| Max IOPS | 2,000 | 6,000 | 20,000 | 80,000 | 160,000 |
| Usable as OS Disk? | Yes | Yes | Yes | No | No |
Operating System
Azure offers a variety of OS images for VM installation, including various Linux distributions. You choice of VM can impact your hourly compute price, as the cost of OS license is bundled into the price.
You can explore the Azure marketplace for advanced images (that include OS and popular software tools) simplifying setup. For example, if you need a wordpress site, the standard technology stack would consist of a Linux server, Apache web server, a MySQL database and PHP. Instead of individually setting up and configuring each component, you can use Azure marketplace image to install the entire stack at once.
Additionally, you have the flexibility to create your own images with necessary components and use them to create VMs. You can create individual images for development and testing purpose or utilize Azure compute gallery to manage multiple images and replicate them across regions.
Azure VM Sizing
To determine the appropriate Azure VM size, thoroughly analyze your workload requirements, including CPU, memory, storage, and network bandwidth usage.
Based on these workload requirements, you can select from a subset of available virtual machine sizes. Prioritize factors like performance, scalability, cost-efficiency and consider future growth. Testing and monitoring will be key to ensuring optimal performance on Azure.
Availability and Scale
Azure VM Availability
For a services company, the cornerstone of success lies in the quality of its service level agreements (SLAs) with customers. These SLAs establish the gold standard for continuous service availability and utmost data security, which are mission-critical objectives.
Azure steps up to the plate with a suite of powerful tools designed to manage availability, data security, and monitoring, ensuring your services remain consistently accessible to your valued customers.
However, managing virtual machines (VMs) extends beyond the realm of handling the operating system or installed software. It’s essential to stay well-informed about the range of services Azure provides to guarantee service availability and streamline automation. These services play a pivotal role in crafting a well-rounded business continuity and disaster recovery strategy for your organization.
What is Availability?
Availability, in essence, signifies the state in which a service is accessible and operational without interruptions or downtime. It encapsulates the service’s ability to remain accessible and responsive, delivering uninterrupted resources and services for running workloads and applications
In simpler terms, “availability is the percentage of time a service is accessible for use”. Achieving high availability implies ensuring acceptable continuous performance, even during temporary hardware failures, data centers disruptions or fluctuations in load.
Azure understands the criticality of high availability in today’s digital landscape. It provides an array of robust tools and services that empower organizations to build resilient, always-on systems. Whether it’s through load balancing, redundancy, failover capabilities, or advanced monitoring, Azure equips you with the means to craft an availability strategy that aligns with your business objectives.
How does availability matter in Azure?
In the world of modern business, where downtime can translate to lost opportunities and revenue, high availability becomes a strategic imperative. It’s not merely about keeping the lights on; it’s about ensuring that your services shine brightly, uninterrupted, and at peak performance, even in the face of adversity.
In the Azure cloud ecosystem, availability is not just a buzzword; it’s a crucial factor that underpins the reliability and performance of your applications and services.
Azure Data Centers and Physical Servers
Azure’s infrastructure is built upon a vast network of datacenters which hosts physical servers that run Azure virtual machines (VMs). However, even in the most advanced datacenters, physical servers may encounter failures, ranging from hardware glitches to unforeseen issues.
When such failures occur, the virtual machines hosted on these affected servers are at risk of disruption. To counteract this, Azure employs a robust self-healing mechanism. In the event of a physical server failure, Azure automatically migrates the impacted VMs to healthy host servers. This migration ensures that your applications and services remain available, but it’s essential to note that it may take several minutes to complete.
Impact of Azure Updates
Azure is a dynamic cloud platform that constantly evolves to enhance platform reliability and performance. Part of this evolution includes periodic updates, which encompass critical tasks like software patching and hardware upgrades.
Azure meticulously executes these updates to minimize disruptions to guest VMs. However, there may be instances when a VM requires a reboot to finalize an update or upgrade. During this process, there is a temporary interruption in service availability.
Additionally, Azure initiates periodic updates that can also impact VMs. These updates includes software patches, and hardware upgrades, which are crucial for enhancing platform reliability and performance. Azure usually executes these maintenance without affecting the guest VMs. However, there might be occasions when the VMs requires a reboot to complete an update or upgrade.
Achieving High Availability in Azure
Azure recognizes the paramount importance of high availability for businesses and offers a range of features and strategies to achieve it:
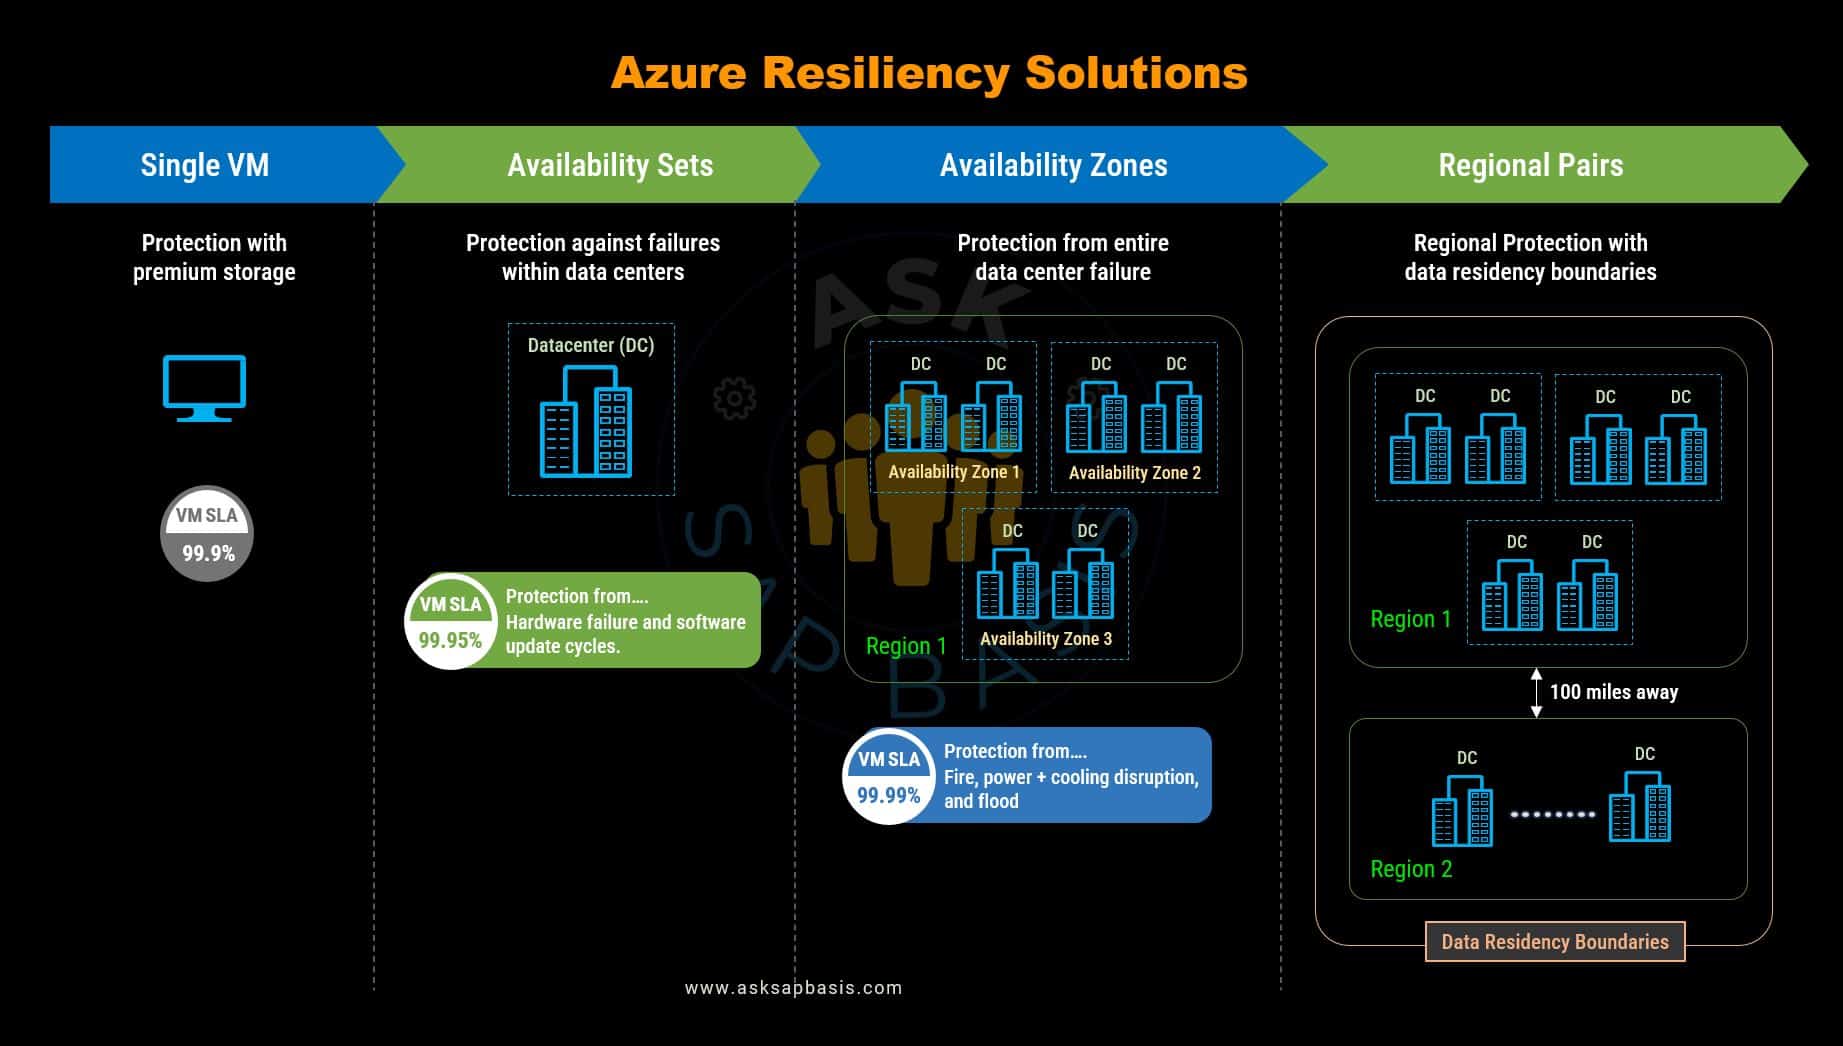
- Availability Sets: Availability sets allows you to group VMs within availability sets. This ensures that VMs are placed in separate physical racks to mitigate the risk of simultaneous hardware failures affecting all VMs.
- Availability Zones: By distributing resources across multiple datacenters within a region, Azure’s availability zones offer high redundancy and fault tolerance. Applications can seamlessly fail over to a different zone if an issue arises.
- Regional Pairing: In regional pairing, Azure pairs geographically distant regions, providing disaster recovery capabilities. In the event of a regional outage, applications can fail over to the paired region, minimizing downtime.
- Azure Site Recovery (ASR): ASR enables you to replicate VMs and services to a secondary Azure region. This not only safeguards against regional outages but also supports planned failovers for maintenance and updates.
- VM Scale Sets: Scale sets help you maintain application availability by automatically distributing VM instances across fault and update domains. This ensures that your application remains responsive and resilient.
In summary, availability is a tangible and strategic aspect of your cloud operations. Understanding Azure’s built-in mechanisms and features for achieving high availability is crucial for ensuring that your applications and services remain accessible and performant, even in the face of unforeseen challenges. By embracing Azure’s availability solutions, you empower your organization to thrive in a resilient and ever-evolving cloud landscape.
Azure VM Scale Sets
Azure VM Scale Sets offer a seamless way to effortlessly create and manage a group of load balanced VMs, that can dynamically adjust their scale (increase or decrease) in response to pre-defined schedule. This intelligent scaling ensures optimal performance and cost efficiency.
Be leveraging scale sets, you ensure high availability for your applications, while gaining centralized management, configuration and updates for multiple VMs. Its worth noting that there are no additional cost for using the scale set itself; you only pay for the individual VM instance you create, make it cost effectives solution for managing your application workload.
Why Choose VM Scale Sets?
- Simplified Management: Streamlines the process of creating, configuring, monitoring and managing multiple VMs. With centralized management, you can efficiently oversee your entire VMs, reducing administrative overhead.
- Scalability: Empowers your application to dynamically adapt to varying workloads and demands. VM scale sets enable dynamic scaling of resources, ensuring your applications are always responsive and perform at their best even during traffic spikes.
- High Availability: With flexible orchestration, it distributes VM instances across fault domains in a region or within an availability zone. This guarantees high availability and resiliency, even when dealing with a large numbers of VMs (up to 1000).
- Load Balancing: Access your application through a load balancer, actively distributing requests to one of the application instances. This efficient load balancing ensures uninterrupted service, redirecting traffic during maintenance or updates.
- Auto-Healing: Azure VM scale sets includes auto-recovery mechanisms. They automatically replacing any unhealthy VM instances, maintaining the desired instance count and ensuring continuous application availability.
- Global Reach: Deploying scale sets across multiple Azure regions, allows your applications to have a global presence. This not only enhances the reach of your services but also reduces latency for end-users world-wide.
- Integration Diversity: Leverage Azure’s extensive ecosystem of services by integrating VM Scale Sets with Azure Monitor, Azure Auto-scale, and other management and monitoring tools. This comprehensive control enhances your ability to manage, monitor, and optimize your applications.
Azure VM scale sets empower businesses with a robust, efficient, and flexible infrastructure solution, enabling them to deliver high-performing, resilient, and cost-effective applications to their customers.
Whether you’re dealing with variable workloads, ensuring high availability, or expanding your global presence, VM Scale Sets are a valuable asset in your Azure toolkit. With centralized management and powerful scaling capabilities, they simplify operations and make your applications more adaptable, ensuring they thrive in today’s dynamic digital landscape.
Azure Pricing
In the dynamic world of cloud computing, understanding the costs associated with your Azure services is paramount. Microsoft Azure recognizes this need and offers a user-friendly tools like Azure pricing calculator and Azure TCO calculator. These tools are designed to empower users in estimating and comprehending the expenses tied to various Azure services. Let’s explore how this tool can help you effectively plan and budget your cloud resources.
Azure Pricing Calculator
Azure Pricing calculator is a user-friendly online tool provided by Microsoft Azure that helps you estimate and understand the cost associated with various Azure services. It allows you to plan and budget your cloud resources effectively.
The Azure Pricing Calculator organizes Azure products into intuitive categories, placing the power of cost estimation at your fingertips. Within these categories, you can customize your estimates to align with your specific requirements. The result? A comprehensive estimated price breakdown that sheds light on the costs associated with each resource you’ve added to your solution.
The pricing calculator offers various configuration options between products, which can include:
- Service Selection: It all begins with selecting the Azure services you want to utilize. This selection spans a wide spectrum of services, including virtual machines, storage, databases, and networking solutions.
- Region: A region represents a geographical location where your services are provisioned. The choice of region matters. Azure data centers are strategically located worldwide, and you can select the appropriate data center in a regions where you intend to deploy your resources. Different regions have varying pricing options, so your selection can have direct impact on your overall costs.
- Tiers: Azure offers different tiers such as basic or standard tier. These tiers cater to different requirements, providing various level of availability, performance, and associated costs.
- Billing Options: Exploring billing options allows you to find the payment methods that best suit your needs. These options can vary based on your customer type and subscription, and they may include cost-saving choices.
- Programs and Offers: Depending on your customer or subscription type, you may have access to specific licensing programs or special offers. The calculator also suggests potential saving options, such as leveraging reserved instances or utilizing Azure Hybrid Benefit, to reduce your expenses.
- Customizing Parameters: Beyond selecting services, you have the flexibility to customize the parameters. Specify the number of virtual machines, storage capacities, and data transfer volumes to match your unique requirements.
- Real-time Estimation: As you make adjustments, the pricing calculator dynamically calculates the estimated costs in real-time. It provides a clear, transparent breakdown of costs for each selected service and the overall estimated expense.
For businesses and individuals seeking to optimize their cloud spending, the Azure Pricing Calculator emerges as an invaluable tool. It offers transparent insights into cost, enabling informed decisions that stay within budget while maximizing the value of Azure services tailored to specific needs.
In the ever-evolving landscape of cloud computing, the Azure Pricing Calculator stands as a beacon of clarity, helping users navigate the complex terrain of pricing with confidence and precision.
Azure TCO Calculator
In the world of cloud computing, making informed decisions is paramount. Microsoft offers a powerful tool called Azure TCO calculator, to shed light on total cost of ownership (TCO) associated with your workloads.
The Azure TCO calculator is a comprehensive financial analysis tool that allows customers to compare the overall cost of operating their workloads in Azure with on-premise solutions or other cloud providers.
TCO, the term often shrouded in financial complexities, gains renewed relevance in cloud era. Operating a on-premise technology capabilities can present challenges when it comes to identifying all the hidden costs. Some expenses, such as software licenses and hardware, may not always be evident upfront. To navigate these financial waters careful consideration is required to unearth and accurately account for these expenses.
The Azure TCO calculator takes a holistic approach, factoring in diverse elements:
- Infrastructure Costs
- Operational Expenses
- Labor Costs
- Savings from Economics of Scale
By leveraging this powerful tool, customers can embark on a journey of financial clarity. Here’s how it works:
- Input Your On-Premises Workloads: You initiate by inputting the details of your on-premises workloads.
- Review Industry Average Costs: The TCO calculator suggests industry average costs (adjustable) for related operational expenses, providing valuable benchmarks.
- Compare Costs: This tool generates a side-by-side report, allowing you to compare the costs of running equivalent workloads on Azure with those of on-premise solutions.
The true beauty of the Azure TCO Calculator lies in its ability to extend the horizon of your financial analysis. By comparing TCO over an extended period, customers gain insights into the long-term cost benefits and potential savings achievable by migrating their workloads to Azure.
With TCO insights in hand, organizations can embark on their cloud journey with a clear vision, optimizing costs and driving value.